In the fast-paced world of digital communication, sending an email to the wrong recipient or with incomplete information can happen to the best of us. Fortunately, if you’re an Outlook user, there’s a solution at hand. The email recall feature in Microsoft Outlook is a powerful tool designed to help you manage your communication more effectively by allowing you to retract an email that has been sent in error. This comprehensive guide will walk you through the process of recalling an email in Outlook, offering detailed steps, tips for success, and insights into the limitations of the feature.
Understanding the Email Recall Feature in Outlook
The recall function in Outlook is essentially a way to “unsend” an email that has been mistakenly sent. This feature is particularly useful in a professional environment where sending information prematurely or to the wrong person could have significant repercussions. However, it’s crucial to understand the mechanics behind this feature to use it effectively. The recall option is available in Outlook but comes with certain restrictions related to the recipients’ email environment and how they’ve interacted with the original message.
Prerequisites for a Successful Email Recall
Before attempting to recall an email, it’s important to ensure that certain conditions are met. First and foremost, both you and the recipient must be using Microsoft Exchange Server accounts within the same organization. Additionally, the recipient’s Outlook program must be set up to process meeting requests and notifications automatically. If the recipient has already opened the email, the recall attempt might only notify them of your attempt to retract the message, depending on their settings. Therefore, timing and the recipient’s email environment play critical roles in the success of the recall process.
Step-by-Step Guide to Recalling an Email in Outlook
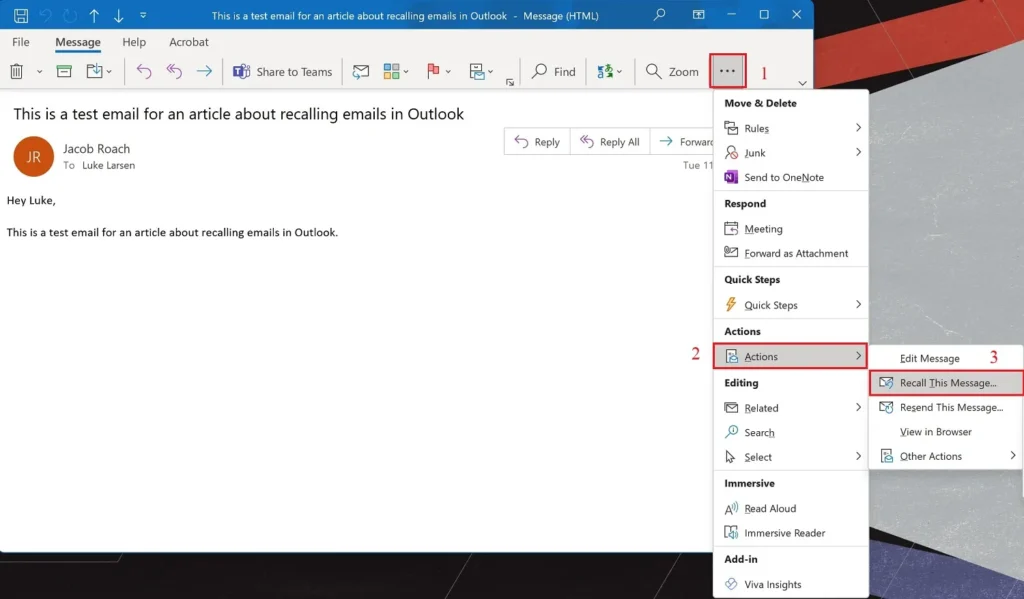
To initiate the recall process, follow these steps:
Open Outlook and Navigate to the Sent Items Folder: Locate the email you wish to recall. This action must be taken from the Outlook application, as the web version does not currently support this feature.
Double-Click the Email to Open It: Once open, look for the “Actions” option in the “Move” group within the “Message” tab. From there, select “Recall This Message.”
Choose Your Recall Option: Outlook offers two recall options – “Delete unread copies of this message” or “Delete unread copies and replace with a new message.” If you choose to replace the message, you’ll be prompted to write and send the replacement email immediately.
Finalize Your Recall Attempt: After selecting your preferred option, click “OK.” If you’re replacing the message, proceed to compose and send the new email.
Tips for Maximizing the Success of Your Email Recall
To increase the chances of a successful recall, consider the following tips:
- Act Quickly: The sooner you attempt to recall the message, the less likely the recipient is to have opened it.
- Informal Warning: If it’s appropriate and feasible, you might inform the recipient via another communication method (like a quick phone call) about the mistake, asking them not to open the email until the recall process is complete.
- Understand the Limitations: Recognize that the recall feature has its limitations and isn’t always guaranteed to work, especially if the recipient is using a different email client or has already interacted with the email.
Limitations and Considerations
The recall feature does not work in all scenarios. For example, if the recipient is using a different email client (such as Gmail or Yahoo), the recall will not be successful. Additionally, recall attempts will fail if the email has been moved from the Inbox or has been read by the recipient. Understanding these limitations is key to managing your expectations and communications effectively.
Conclusion
Recalling an email in Outlook can be a lifesaver in situations where an email was sent prematurely or to the wrong person. While the process is straightforward, its success hinges on a number of factors, including the recipients’ email environment and whether the email has been read. By following the steps outlined in this guide and considering the tips and limitations discussed, you can navigate the recall process more effectively and maintain the professionalism of your email communications.
Read Also: How to Use Snipping Tool

